A week back we had a very violent thunderstorm. It blew up a laptop PSU (fuse blown) but the oddest one is that my scooter got blown over and when I tried to start it wouldn’t fire. Thought it was low fuel but after top-up of the tank and a lot of cranking it was pretty clear I had more of a problem. The rest of this post details how I fault-found this problem.
The ignition system for this generation of bikes is fairly simple consisting of a TDC sensor in and an output to the ignition coil primary (plus 12 V and ground).
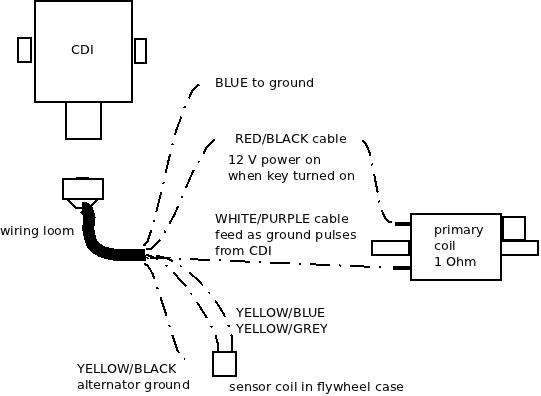
When the ignition key is turned on then this provides 12 V to the CDI and to one leg of the ignition coil primary. The other leg of the ignition coil primary goes back to the CDI unit. To fire the coil the CDI unit applies and removes ground to this primary coil leg. So a high current pulse then flows through the primary which energizes the primary coil, which is then multiplied in voltage by the ratio of windings to the secondary coil, the pulse of electricity is then discharged through the ignition leads through the spark plug to the engine ground. The CDI knows when to fire because a coil pickup on the flywheel tells it when it is TDC.

Checks – Ignition Coil and Sparkplug
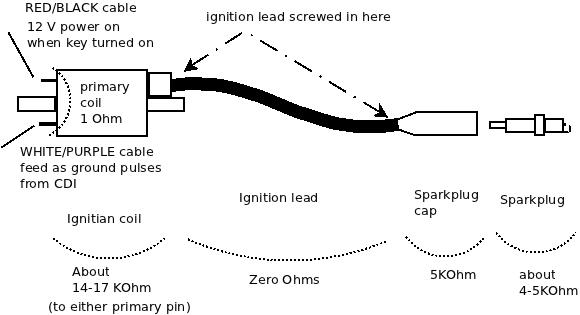
The ignition primary coil is easily checked. Looking at the coil (on the right hand side of the bike under the inspection panel), it has a RED/BLACK cable to the key, a WHITE/PURPLE cable to the CDI, a fat black cable to the sparkplug.
To stabilize the very high voltage secondary coil pulse the sparkplug cap and the sparkplug are resistive. The cap is 5 KOhms and the sparkplug is also about 4-5 KOhms. The ignition lead is screwed into both the ignition coil and the sparkplug cap. The coil and plug has what looks like a woodscrew poking out deep inside hidden in the coil or plug and you screw the ignition lead onto that point. The ignition lead cable can and will on older bikes have internal damage in its conductors near where the lead screws in if the cable is old. If you remove the sparkplug from the engine then click it back into the sparkplug cap then you should see about 25 KOhms from the centre electrode in the tip of the sparkplug back through to the primary coil (the primary and secondary are joined on one leg and it is only 1 ohm between the primary coil). If you do not then check the spark plug has about 4-5 KOhm resistance from its centre electrode in the tip to the small threaded end. If it doesn’t e.g. it is open circuit then replace that sparkplug and hopefully that is your only problem.
If it is OK then unscrew the ignition lead from the ignition coil secondary. Now measure the ignition coil secondary from the screw tip that you can see poking out to the primary coil tabs. If this is not about 17 KOhm but open circuit then you have a broken ignition coil but if it is a few KOhms then check the part is the same – secondary on ignition coils can be different. You really only care about shorts i.e. zero Ohms or open circuit i.e. infinite KOhms. Replace this if it is clearly broken.
If this is OK then measure from the ignition lead core wires (which you can now see on the end you unscrewed from the ignition coil) to the sparkplug cap. It should be about 5 KOhm. If not then unscrew the sparkplug cap from the ignition cable. It has a similar woodscrew deep inside it that you screw the ignition lead onto. The cable is a multi-core of fine wire and it may have frayed and broken internally. Measure its resistance and it should be zero ohms. Wiggle the cable – internal breaks can be felt as a soft section that more easily moves than the rest of the cable. If the cable is OK then measure the sparkplug cap and it should be 5KOhm. If it is not then replace this. If that is OK then you are disturbing the break that you originally detected and it is probably in the cable where it screws in to the coil or sparkplug cap. You may have enough spare lead to cut off the end to get to unfrayed core wires, if not then you need some new ignition cable.

Checks – CDI
In my case I did all that but it wouldn’t fire. Now you will have to remove the bike body covering to get at the CDI. I won’t describe that but you basically remove any helmet carrier on the rear, remove the read handhold, unscrew the rear light cluster, license plate holder, undo all the little screws under the seat, the big screws towards the lower front near the feet-stands and then slide the body panel back as one big mass. The CDI is on the right hand side with a 6-pin cable plug.
Unclip this and do the following checks by poking your multimeter probes into the socket,
- BLUE is Earth – make sure it is and is zero ohms to the YELLOW/BLACK
- WHITE/PURPLE goes to the Ignition coil primary – check it is zero ohms to that coil and that when the RED/BLACK is removed from the coil primary, that there is no shorts to ground or the RED/BLACK socket (here)
- RED/BLACK goes to the 12VDC keyed off the ignition same as the power to the coil – so should be zero ohms to the battery positive.
- YELLOW/GRAY goes to one side of the TDC sensor coil – there should be about 240 Ohms resistance between this pin to the YELLOW/BLUE
- YELLOW//BLUE goes to the other side of the TDC sensor coil – see the YELLOW/GRAY cable.
- YELLOW/BLACK is Earth so should be zero ohms to the engine frame.
If all those seem to be right then you are pretty well left with one conclusion and that is the CDI itself is not working. This is fully sealed and cannot be repaired. Your best bet is to buy one second hand. Make sure you get the exact DENSO part number.
In my case the faulty unit had the WHITE/PURPLE signal which goes to the ignition coil primary was always on as a ground signal. It should never be always on but pulse a ground. I can only guess it was shorted out inside the CDI. All that happened was that the ignition coil would heat up.
Checks – firing sparkplug out of engine (caution)
This is a more dangerous check but I’ll include it for completeness. You can see if the sparkplug is sparking as follows,
- remove sparkplug from engine and click back into the sparkplug plug. Feed the ignition lead and sparkplug to the right-hand side of the bike away from the open engine sparkplug hole and so you can see the spark when you fire ignition switch
- Ideally fit a spare sparkplug into the engine sparkplug hole BUT if you do not then you must do this testing outside because petrol mist will leave the engine so you want a lot of ventilation
- use a jumperlead to connect the sparkplug screw thread to the engine body. I use a battery jumper lead as these are very low resistance.
- turn on the ignition and try to crank engine. You should see a bright blue-white spark pulses even in daylight. If you do then your starting problem is not ignition but perhaps fuel. If you get only ONE spark when the ignition is turned on then you have my problem of a shorted out CDI. If you get NO sparks then assuming your test setup is fine and you have tested all the other components then it is the CDI with a faulty open circuit.
Enjoy your bike riding !
