
This is electronic related so I’m going to post this. Three different problems,
- Right at the start of the summer holidays our children’s PS3 bluray disk drive started to play up; symptoms are spurious ejects after load and poor reading of disks.
- Then at the Christmas holidays the disks were not loading at all and the blue load light was always on.
- and there has also always been a problem of poor on/off switch performance.
What I did (out of warranty repair – if your PS3 is still under warranty then let the store work out the problem),
1) Slide-remove the decorative cover (to left when PS3 is lying down flat with the bluray slot to the right) and then undo the 7 screws on the top case cover (has one short size screw and the rest are long – the hole with an ‘S’ is the short screw). Push in the tab at the back right hand side and then lift off the case cover up from the back – there are a row of tabs on the front that you pivot it out of these.
2) Unscrew the PSU – it has 5 screws in total (2 longer plus 3 medium), one plug on the front, the main 230 Volts on the back AND it has a pair of blade pins hidden towards the front so just lift it UP to slide out of the socket.
3) Un-connect the Bluray DVD ribbon cable by flipping up the black locking tab and remove the white 4-wire power plug for the Bluray on the front.
4) Flip the Bluray over and remove the 2 x silver and 2 x black tiny screws.
5) Remove the metal case cover. The DVD top retainer will fall out. It is OK it’s held in by nothing but the case.
6) Note the EXACT position of the white rotary parts that you can see. Remove the two tiny black screws on the main part of the disk loader mechanism – they are towards front. Pop up the two tabs on each side carefully. This whole lot comes off.
7) Pop in the tab in the middle of the front disk loader mechanism to release this. This lifts up.
8) Clean out all the dust bunnies. Note that the lefthand rack does not touch the black cog – that’s how it is designed.
9) If disks are not loading or the blue disk load light remains on even when there is no disk in place then the right hand side has a PCB that has 3 tiny switches on it – 2 vertical that detect when disks are inserted and 1 flat that detects when the mechanism is in a ready position. Use a multimeter and check that these switches close circuit when pushed in and keep closed when you wiggle things around. The one I had fail was the flat one that gets moved by the tray mechanism. It can be dismantled and cleaned out (to do this unscrew the PCB, remove the flat ribbon on the underside, and use a finger-nail and pliers to pop out the switch lever. Clean any gunge on the back inside of the switch with a 0.5 mm solid wire e.g. wire gauge. 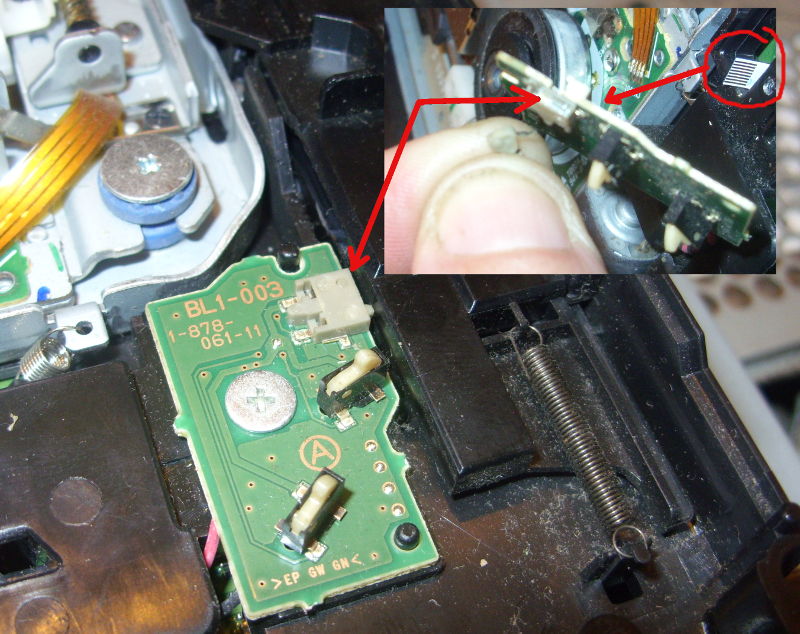
10) Reassemble is in reverse BUT how the loader mechanism works is that as the disk is powered (tiny sensor switch to right) in then the left hand levers on the back part of the disk loader mechanism rotate anticlockwise as a disk is loaded and then this moves the left hand rack slider a bit so it hits the black cog. This cog then pulls the rack to the front and the slider then raises the platen. If you do not set the rotary parts right into the left hand slider then when the disk is loading it doesn’t rotate these bits of plastic so they don’t shift the slider to engage with the cog of the motor. You should be able to rotate the smaller left hand rotary part around so that it engages into a slot on the left hand slider – if you simulate a disk load then you will see it take up the slack in the left hand slider and hit the cog. If its doing that then this should work. It took a bit of practice to get this right.
Reassemble all the screws and stuff in reverse. There is no safety interlock so if you can run the Bluray with no cover and you should ideally do this without screen or controllers to verify the mechanism is loading and ejecting disks. It will save you some hassle of re-assembling the lot only to have the disk disks not load !
If you are failing to get the disk to load right then you can run everything without covers or screws – just remember to keep the round white disk weight in place and DO NOT LOOK AT THE PRETTY LASER. If the PS3 starts up and the disk isn’t pulling in disks then check the ribbon cable is inserted right under the PSU. The LASER works but the motor won’t pull in disks if that ribbon cable under the PSU is out or out of alignment.
EXTRA: With the top cover off then the eject and power On/Off switch works by touching the small square metal pins on the PS3. These are connected to the outside case by metal strips that make contact when the case is re-assembled. To fix any poor On/Off switch (or eject switch) operation carefully lift up these metal pins so that they make better contact with the top case metal tabs.
That’s all – hopefully you’ll save the 40 quid for a new Bluray drive if you manage to get your old one cleaned out OK and your Playstation 3 will last for many years more.