Old Java version uninstall stuck with mismatched uninstaller

A client of mine had finally got long-haul WIFI into their area. Before that they were on Satellite Internet with a very low and capped quota (4 GB/month). Consequently things like Java and Windows updates were manual. As they were in the middle of no-where then not too many site visits by me either.

I remote desk-topped into their machine and was doing updates for them. The Java was version 6 so I added version 7 and tried to uninstall version 6. It wouldn’t do this. The uninstaller dialog box referred to a different version from what it said was installed in the Control panel installed applications list and it didn’t  remove the installed version anyway but just exited.

The fix I found was to download the most recent Java version 6 (update 39) and install that and then that updated the installed software list and flushed the problem. I then uninstalled that new version and it worked – Java 6 was gone.

WordPress HTML markup breaks plugin shortcodes

I was extending a WordPress plugin (I don’t think the actual plugin matters but it was the very useful posts-in-page plugin). It has a loop (posts_loop_template.php) that displays the posts on a page. We need this for a web shop.

On the page I had the plugin shortcode, [ic_add_posts thumbnail=’thumbnail’ showposts=’5′ postlink=’1′ layout=’0′ metacats=’0′ metacomments=’0′] as shown and in bold (for no particular reason).

I noticed that my code changes had stopped working.  An hour or so ago they had worked but after adding some of the new options they stopped working. I removed the plugin and added it back (it started working) and then I added back my edits and managed to trigger the problem again. This time I had more data and it was obvious what had gone wrong. When I added in the shortcode options then when you look at the “Text” version I saw that the new option had html markup around it,

<strong><strong>[ic_add_posts thumbnail='thumbnail' showposts='5' postlink='1' 
layout='0' metacats='0' <strong>metacomments='0'</strong>]</strong>
 </strong>

This caused the option arguments to be parsed wrong by WordPress – or perhaps correctly but it wasn’t what I wanted. The options array ended up like this and you can see the “metacomments” option was not parsed but is in the array as [0] => metacomments=’0′ and not [metacomments] => 0

Array ( [post_type] => post [post_status] => publish [orderby] => date 
[order] => DESC [template] => [posts_per_page] => 5 [thumbnail] => thumbnail 
[showposts] => 5 [postlink] => 1 [layout] => 0 
[metacats] => 0 [0] => metacomments='0' [post__not_in] => Array ( ) ) 

When I removed the html formatting from around the plugin shortcode then it worked perfectly. As a guess WordPress should strip tags but that may have backward compatibility issues.

How to Fix Stalled Outlook incoming email.

If the Outlook emails fail to be picked up then it is probably some junk SPAM and probably malformed using international character sets. To fix this,
a) In Outlook pick,
Tools -> Send/Receive -> “< the broken account name>” Only -> Download Inbox Headers

b) Outlook will now download just the headers. The first one that comes in (i.e. the oldest one) is probably the bad message that is breaking Outlook e.g. if it is Monday and you are getting emails up until Saturday evening then the next message on Saturday evening is probably the bad message.

c) Right-mouse on that message and select “Open”. It will not have any local message but will ask what you want to do. Pick the last option of,
“Mark to delete this message from the server”

And then do OK.
d) Now do your normal Send/Receive All and all the backlogged messages should download normally and any marked for deletion emails (as above) will be automatically deleted.

Site Landing Page fronting WordPress

A client wanted a site-wide landing page with some basic images and a few navigation buttons to front-end their WordPress site and other places like their Etsy shop and Social media links.  Out of the box WordPress allows you to define a home page (see under the admin options for Settings->Reading) but that isn’t exactly what they wanted as that is still within WordPress and so has the header, menus and footer and all the other stuff related to a WordPress site unless the theme allows for all of these to be turned off.

When you connect to the URL without any path or a resource file name e.g. www.openmutual.org rather than for example www.openmutual.org/blog/example.txt then (using Apache) the file that will be presented if a file is not specified in a URL is decided by the mod_dir  DirectoryIndex directive (or in IIS the <defaultDocument> elements).

WordPress by default has an index.php file in its root and usually this is what is normally used. If your hoster has setup their DirectoryIndex similar to the above then the index.html file will override the index.php If so then you are good to go. If not then you will have to get your hoster (or it may be you) to get index.html being dished out in preference to index.php. The two options open to my client are to,

a) move the WordPress out of the site root e.g. move the files to /blogging or similar subdirectory and then add a static web page e.g. index.html
b) or add an index.html with static code in it that will be run first before index.php

The option a) is obvious but I wanted to avoid that for the moment so I picked b) to see if that would work. Please read the “quirks” at the bottom and test this on your own test beds before playing with a client site !

Step 1) On WordPress create a new page with any name and slug (we’ll called it My Home and have a slug of my-home )
Step 2) Copy the contents of the existing Home page to this new page (use control-C and control-V or similar)
Step 3) There is usually no need to change anything in Settings->Reading for the front page displays but you cannot set it to a Static page that is navigable in the menu. The reason being is that whatever you set as the WordPress Static front page is given a slug of /. If it is already set to posts of Home then you can leave it as that.
Step 4) Edit your Theme menu in Appearance -> Menus and remove the existing “Home” or whatever has a slug of your site root (/) and replace it with your new copied home page (in my example “My Home”)
Step 5) You can add the original Home page back but give it a different name e.g. “Site Root” as it will jump you back to the non-Wordpress file.
Step 6) Test that your tweaked WordPress site still works OK. You won’t notice many problems yet.
Step 7) Create an index.html file and have at least the one link to your new “My Home” WordPress slug e.g. <a href=”./my-home”>My Blog Site</a>
Step 8) Upload and check the new file gets priority. If not then check the Apache mod_dir  DirectoryIndex directive is set correctly e.g.

<Directory /> 
DirectoryIndex index.html index.php 
</Directory>

That is all is needed. Now when web visitors hit your web site they will get the index.html and they can then navigate from there. When they click any WordPress link slug from that landing page then they then go to your WordPress site and will stay there unless you have given them a menu option to escape back up to the index.html.

Quirks:

  • You MUST set Permalink Settings to something other than the default of …site/?
  • When you are in Media Manager then when you try and view an attachment then it will go to the attachment page and not the media file link.
  • When you insert an image into a post or page then do not use the attachment post ID but the media file link.
  • This may not work on other web servers – I have only done this on Apache

Bypass LCD fan hardware POST on SONY all-in-one VGC-V2M

A client has a SONY VGC-V2M all-in-one PC. It is like a fat TV – a P4 based motherboard in a black case with built-in LCD, DVD, and all the usual sockets.

If it halts on a LCD FAN hardware error then the computer is still usable until you can investigate further. At the American Megatrends BIOS POST then do the following sequence to get Windows booted,

F2     to get to BIOS
ESC    to exit from bios it will ask to discard or not
<return or enter>  to pick the OK to discard

now Windows will continue to boot.  Now is obviously the time to make sure your backups are up to date !

Adding Memory

As an aside it is actually easy to upgrade the memory in this all-in-one. You slide the back up a few inches until it catches and then it sort of pops off by moving it back away from the case. How it latches is some locking tabs that fit through gates into a slide so you have to slide the back up until the tabs are aligned at the gates and then it easily pops off backwards. Don’t force it.

The memory is under the metal panel on the right hand side (looking from the back). Motherboard has two slots and AFAIK it is 1 GB max of DDR PC3200 400 Mhz CL3 or similar per slot. You probably have 512 MB fitted and running Windows XP so for routine Office use just fit another 512 MB for the cheapest upgrade as Windows XP is now unusable rubbish on only 512 MB but fine on 1GB. Maximum is 2 GB in total i.e. 1GB+1GB.

Internet Explorer (IE8,IE9) slow page load due to Flash and ONSPEED sliprt.dll

Client complained about slow internet page loads. They use Windows Vista and Internet Explorer 8 and to date it had been fine. When I looked at the problem it was just like the browser was stalled trying to connect to a down host. It would take minutes to load a page and was basically unusable. Very frustrating because Opera and Firefox both worked fine.

I got them working temporarily on Opera and arranged to pick up the laptop when they went on holiday for a few days. Back at base I tried a few things which did not work

  • IE8 -> IE9 upgrade
  • IE9 -> IE8 downgrade (uninstall IE9)
  • ONSpeed uninstall and re-install

and then I just got the feeling that flash was a problem. I downloaded the flash installer (which is a downloader not the full application) and tried to run this.

I got an error message about sliprt.dll was not found e.g. This program can’t start because sliprt.dll is missing from your computer.  Try reinstalling the program to fix this problem. The sliprt.dll is part of the Slipstream which is used by ONSPEED. This is HTTP cache/accelerator. The dll does exist in \Windows so obviously some other problem and the error message is due to a missing program call.

I then downloaded the full flash install file ( see http://forums.adobe.com/thread/889580 ) for both Internet Explorer and for “Other Browsers”.

These ran OK and installed without error. This cleared my Internet Explorer stalling and running slow problem and now IE8 is working fine. I upgraded to IE9 and that is also working fine. I was also able to upgrade to Windows 7 Home Premium (using upgrade disk) and the laptop remained stable.

May not work for you but it fixed my client problem.

Enabling anchor for Disqus comments on WordPress site

When you add Disqus to your site e.g. as I did with http://www.lincolnphipps.org then make sure that the following Disqus plugin advanced option is set,

Comment Counts   [ * ] Output JavaScript in footer

If it is not checked then when you click the post and then click the (theme dependant) link that is usually at the top of a post to jump to the comments at the bottom of the post, it does nothing. The default WordPress anchor tag is #comments but with Disqus it is #disqus_thread

When this disqus plugin advanced option is checked then the correct anchor is used and you will jump to the Disqus comments as expected.


Fault finding CDI ignition Aprilia Leonardo

A week back we had a very violent thunderstorm. It blew up a laptop PSU (fuse blown) but the oddest one is that my scooter got blown over and when I tried to start it wouldn’t fire. Thought it was low fuel but after top-up of the tank and a lot of cranking it was pretty clear I had more of a problem. The rest of this post details how I fault-found this problem.

The ignition system for this generation of bikes is fairly simple consisting of a TDC sensor in and an output to the ignition coil primary (plus 12 V and ground).

When the ignition  key is turned on then this provides 12 V to the CDI and to one leg of the ignition  coil primary. The other leg of the ignition coil primary goes back to the CDI unit. To fire the coil the CDI unit applies and removes ground to this primary coil leg. So a high current pulse then flows through the primary which energizes the primary coil, which is then multiplied in voltage by the ratio of windings to the secondary coil, the pulse of electricity is then discharged through the ignition  leads through the spark plug to the engine ground. The CDI knows when to fire because a coil pickup on the flywheel tells it when it is TDC.
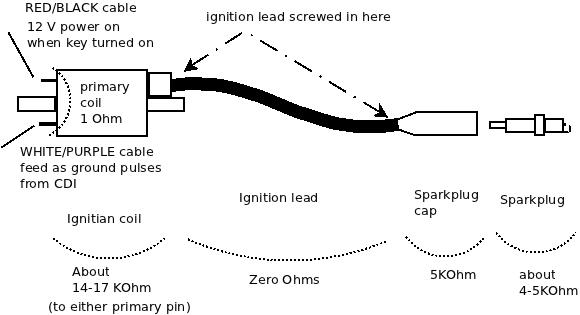
Checks – Ignition Coil and Sparkplug

The ignition primary coil is easily checked. Looking at the coil (on the right hand side of the bike under the inspection panel), it has a RED/BLACK cable to the key, a WHITE/PURPLE cable to the CDI, a fat black cable to the sparkplug.

To stabilize the very high voltage secondary coil pulse  the sparkplug cap and the sparkplug are resistive. The cap is 5 KOhms and the sparkplug is also about 4-5 KOhms. The ignition lead is screwed into both the  ignition coil and the sparkplug cap. The coil and plug has what looks like a woodscrew poking out deep inside hidden in the coil or plug and you screw the ignition lead onto that point. The ignition lead cable can and will on older bikes have internal damage in its conductors near where the lead screws in if the cable is old. If you remove the sparkplug from the engine then click it back into the sparkplug cap then you should see about 25 KOhms from the centre electrode in the tip of the sparkplug back through to the primary coil (the primary and secondary are joined on one leg and it is only 1 ohm between the primary coil). If you do not then check the spark plug has about 4-5 KOhm resistance from its centre electrode in the tip to the small threaded end. If it doesn’t e.g. it is open circuit then replace that sparkplug and hopefully that is your only problem.

If it is OK then unscrew the ignition lead from the ignition coil secondary. Now measure the ignition coil secondary from the screw tip that you can see poking out to the primary coil tabs. If this is not about 17 KOhm but open circuit then you have a broken ignition coil but if it is a few KOhms then check the part is the same – secondary on ignition coils can be different. You really only care about shorts i.e. zero Ohms or open circuit i.e. infinite KOhms. Replace this if it is clearly broken.

If this is OK then measure from the ignition lead core wires (which you can now see on the end you unscrewed from the ignition coil) to the sparkplug cap.  It should be about 5 KOhm. If not then unscrew the sparkplug cap from the ignition cable. It has a similar woodscrew deep inside it that you screw the ignition lead onto. The cable is a multi-core of fine wire and it may have frayed and broken internally. Measure its resistance and it should be zero ohms. Wiggle the cable –  internal breaks can be felt as a soft section that more easily moves than the rest of the cable. If the cable is OK then measure the sparkplug cap and it should be 5KOhm. If it is not then replace this. If that is OK then you are disturbing the break that you originally detected and it is probably in the cable where it screws in to the coil or sparkplug cap. You may have enough spare lead to cut off the end to get to unfrayed core wires, if not then you need some new ignition cable.
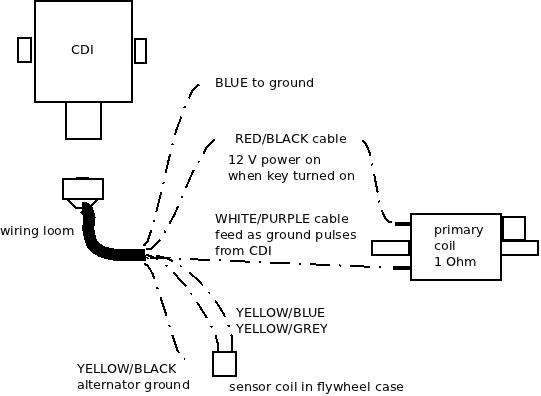
Checks – CDI

In my case I did all that but it wouldn’t fire.  Now you will have to remove the bike body covering to get at the CDI. I won’t describe that but you basically remove any helmet carrier on the rear, remove the read handhold, unscrew the rear light cluster, license plate holder, undo all the little screws under the seat, the big screws towards the lower front near the feet-stands and then slide the body panel back as one big mass. The CDI is on the right hand side with a 6-pin cable plug.

Unclip this and do the following checks by poking your multimeter probes into the socket,

  • BLUE is Earth – make sure it is and is zero ohms to the YELLOW/BLACK
  • WHITE/PURPLE goes to the Ignition coil primary – check it is zero ohms to that coil and that when the RED/BLACK is removed from the coil primary, that there is no shorts to ground or the RED/BLACK socket (here)
  • RED/BLACK goes to the 12VDC keyed off the ignition same as the power to the coil – so should be zero ohms to the battery positive.
  • YELLOW/GRAY goes to one side of the TDC sensor coil – there should be about 240 Ohms resistance between this pin to the YELLOW/BLUE
  • YELLOW//BLUE goes to the other side of the TDC sensor coil – see the YELLOW/GRAY cable.
  • YELLOW/BLACK is Earth so should be zero ohms to the engine frame.

If all those seem to be right then you are pretty well  left with one conclusion and that is the CDI itself is not working. This is fully sealed and cannot be repaired. Your best bet is to buy one second hand. Make sure you get the exact DENSO part number.

In my case the faulty unit had the WHITE/PURPLE signal which goes to the ignition  coil primary was always on as a ground signal. It should never be always on but pulse a ground. I can only guess it was shorted out inside the CDI. All that happened was that the ignition  coil would heat up.

Checks – firing sparkplug out of engine (caution)

This is a more dangerous check but I’ll include it for completeness. You can see if the sparkplug is sparking as follows,

  • remove sparkplug from engine and click back into the sparkplug plug. Feed the ignition lead and sparkplug to the right-hand side of the bike away from the open engine sparkplug hole and so you can see the spark when you fire ignition switch
  • Ideally fit a spare sparkplug into the engine sparkplug hole BUT if you do not then you must do this testing outside because petrol mist will leave the engine so you want a lot of ventilation
  • use a jumperlead to connect the sparkplug screw thread to the engine body. I use a battery jumper lead as these are very low resistance.
  • turn on the ignition and try to crank engine. You should see a bright blue-white spark pulses even in daylight. If you do then your starting problem is not ignition but perhaps fuel. If you get only ONE spark when the ignition is turned on then you have my problem of a shorted out CDI. If you get NO sparks then assuming your test setup is fine and you have tested all the other components then it is the CDI with a faulty open circuit.

Enjoy your bike riding !

vTiger CRM missing language file causes Sorry! Attempt to access restricted file.

When you add a new user (in vTiger CRM v5.4.0) then it is possible that you can select a language setting e.g. “English GB” that has a non-existent translation file. If you do this then that user will get the error message,

Sorry! Attempt to access restricted file.

on a blank screen after they log on. They will stay in this state forever until the logon cookie is removed or the language file is created. The language files exist under the path,

include/language

To fix this you must either

  • upload the correct language file or
  • use another browser and go in as a working user e.g. admin and reset the language to a known working language e.g. English US or
  • clone the include/language/en_us.php to the correct file name e.g. en_gb.php. To identify what file is needed you can add a print_r($filepath); to the include/utils/CommonUtils.php file function checkFileAccessForInclusion() around line 2817 onwards but before the die(). You can’t keep that debug code in place as the ajax javascript breaks but it will tell you what language filename it is after.

That should solve this first-day-of-use problem.

Typical DDI trunking connection problems

Once you have your FreeSWITCH setup then adding new trunks should work fine but you can get some first-day-of-use problems that slow you down.As I find them I will update this post.

Calling PSTN number of DDI trunk, rings then silence.
This is probably due to the trunk on FreeSWITCH not having the  “Register” checkbox set (true). If using bluebox then in the Connectivity->Trunk Manager for the trunk check the Register checkbox. In XML this is in the conf/sip_profiles/ in your .XML file for the profile of the interface you need to verify that register is true,

       <gateway name="trunk_x">
        <param name="realm" value="sip.example.com"/>
        <param name="username" value="xxxxxxxx"/>
        <param name="password" value="xxxxxxx"/>
        <param name="register" value="true"/>
        <param name="extension" value="auto_to_user"/>
        <param name="auto_to_user" value="true"/>
      </gateway>

Calling PSTN number of DDI trunk, rings then very quickly goes to disconnect.
This is due to the inbound ACL not being set to “Trunks (Auto)” on the Sip interface (NAT).


Always getting number unavailable with Cisco dial plan

Dial plans are fairly easy to read but there is one little gotcha if you enter in one of these incorrectly: you will always get number unavailable.

You need to make sure that the dial plan you have entered in is valid i.e. it uses the | pipebar for delimiters and has no spurious close brackets ‘)’

The web interlace of a Cisco IP phone does not validate your input.

FreeSWITCH dialplan system and null strings

In a FreeSWITCH dialplan the application action system is used to execute system e.g. shell commands. You can also use the returned result from a system command to set a dialplan variable e.g.,

<action application="set" data="result=${system myscript.sh"/>

The problem is that if the system directive does not return a null terminated string then extra garbage can end up in the data variable in the dialplan.

So your shell script must explicitly terminate any strings in its output. Normally this won’t be a problem but if you are using piped results and awk then you can end up with no null.

In your awk print you must use printf as follows,

awk '{ printf "%s%c", $1, 0 }'

That will print your string (e.g. $1 field) and then print the number 0 as a character. This in effect fakes what is returned as a string that is null terminated.

Here is the FreeSWITCH wiki on the dialplan use,

http://wiki.freeswitch.org/wiki/Misc._Dialplan_Tools_system

Here are some of my examples as used in custom feature codes,

http://www.openmutual.org/resources/freeswitch-custom-features/


Getting Asterisk packages and pubkey 75307751175E41DF

If you just added the  Asterisk packages using,

sudo add-apt-repository "deb http://packages.asterisk.org/deb `lsb_release -cs` main"

and are now trying to install Asterisk from packages and you get an unsigned key problem,

NO_PUBKEY 75307751175E41DF

then you must do as root,

 wget http://packages.asterisk.org/keys/175E41DF.pub -O - | sudo apt-key add -

You can now reload the packages within Synaptic.

See https://wiki.asterisk.org/wiki/display/AST/Asterisk+Packages#AsteriskPackages-APT%28Debian%2FUbuntu%29

PHP Warning: Invalid argument supplied for foreach()

If you get a Warning: Invalid argument supplied for foreach() but the code looks and seems to work fine then the issue is that foreach() needs an array but you are passing a Boolean due to an error in a previous function.

You will see this problem where you have something that is returning an array or false e.g. glob() and then you pass the returned value to the foreach() without checking if the variable isn’t false. e.g. in this case glob() can return false if it can’t see the path,

        foreach( $paths as $path ) {
            $filenames = glob( $path['path'] );
            if ( $filenames != false ) {
                foreach( $filenames as $filename )

In that example if glob() failed on one of the paths then it would return false. In my example above I check that $filenames is not false before I use it with foreach(). You can also use is_array() as well. To confirm your theory on your code you can add in var_dump() before the foreach() on the variable that you pass to confirm the type of the variable of what you use in foreach().


Fixing lost CMOS on Acer Aspire One

Now it is summer then computer equipment can overheat. An odd problem appeared on an Acer Aspire One model ZG5 also known as the AOA 150 after it got run on a bed. If you are going to watch movies or do work in bed then I recommend to everyone that you buy one of those melamine tea trays and turn the tray upside down and then use that as a laptop support. When the Acer powered up then it had no display. It had power and the hard disk unparked as if to start up but nothing like normal booting activity and always a blank screen. Over-enthusiastically I pulled this computer apart before I looked around for a less screw-driver related fix. The laptop is easy to dismantle once you know how to remove the keyboard (I have already replaced this before – there are no screws but three tabs that are just above the top row of keys and you click these in. The keyboard is then removed, taking care to unclick the flexible ribbon). But I digress and re-assembled it and did this Acer emergency BIOS recovery trick which is detailed on the ACER web site here,

http://support.acer.com/acerpanam/netbook/0000/acer/aspireoneaoa110/aspireoneaoa110faq22.shtml


  1. format a USB key using Windows FAT. Probably work with FAT32 but I used FAT. I used an old 1 GByte key but probably any size would work. It does not have to be bootable – just formatted.
  2. download the latest BIOS ZIP file from the Acer website at http://support.acer-euro.com/drivers/notebook/as_one_150.html  This will currently be v.3314.zip
  3. unzip this BIOS zip file contents into the USB key
  4. rename the ZG5_3114.fd to a new file name ZG5IA32.FD (it must be that name). You should now have at least this ZG5IA32.FD file you renamed and the FLASHIT.EXE Note that the file names are case insensitive – this is DOS.
  5. Insert the USB key into the left hand USB port on the broken Acer.
  6. Insert the Power socket
  7. Hold down the Fn and the Esc keys and then push on the power button as normal keeping the Fn+Esc keys pressed.
  8. The power light will go on then flash and the USB key activity light may also blink. Once the power light has flickered then you can release the Fn+Esc
  9. After all the lights have stopped blinking then it is finished. It should reboot by itself and then it will now be working fine. You will have to reset the date/time.

If it still doesn’t work but it still has the power coming on then retry the process above to make sure you are doing all the steps right as this should fix this problem.