List of emails not being displayed in top folder in Thunderbird after upgrade

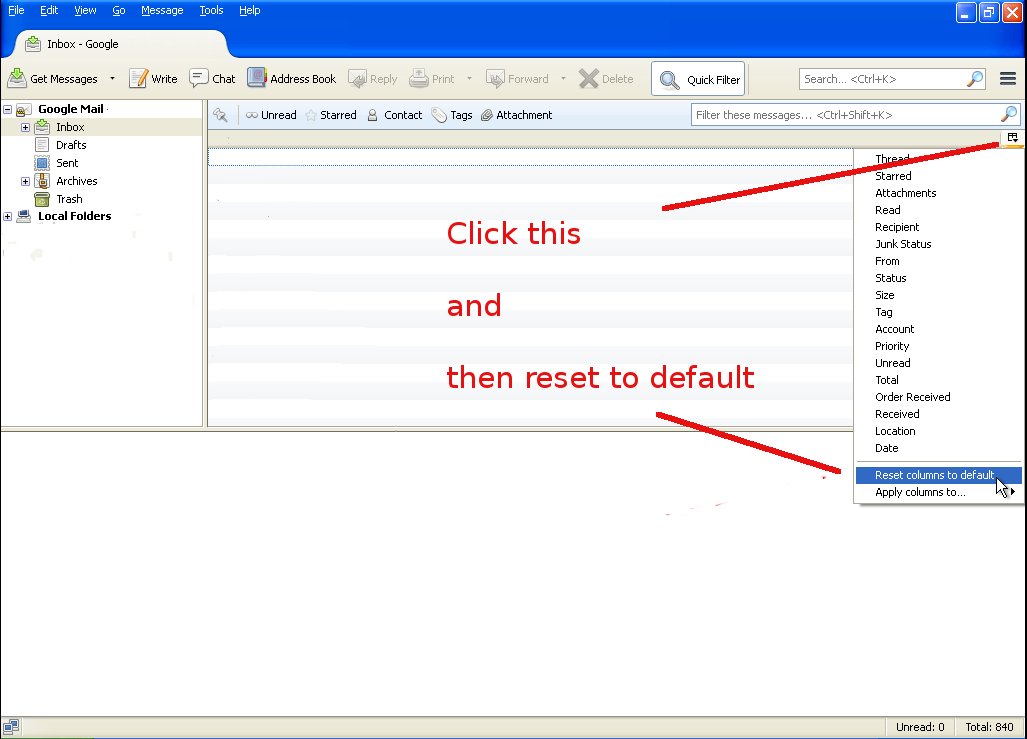
After upgrading from a prior version 6 of Thunderbird to version 31 the top level folder for one account did not show a list of emails. The emails were there and when you clicked on the display it displayed the full email but the space in the list was all blank rows and there was no column headings of subject, dates or recipients as you would expect.

The fix is trivially simple – click the folder display options and reset to the default. You can now fine-tune what you want displayed.

thunderbird-missing-display


memtest86+ cannot load a ramdisk with an old kernel image

This error happens when you use UNetbootin to create an Ubuntu disk and it incorrectly adds a ramdisk to the memtest86+ boot option.

Until UNetbootin fix their code then cursor down to the “Test memory” option and hit tab and then at the boot options remove the “initrd=/ubninit” so that the command line is now just…

/install/mt86plus

and then hit enter and Memtest86+ will now run as expected.

My Ubuntu 14.04 currently has UNetbootin 585-2ubuntu1 and this quirk will possibly be fixed in newer releases but sometimes all you have lying around is an emergency install USB/disk so always good to know how to get around  a problem rather than downloading new code.

tentacle server not logging agent data after Pandora FMS upgrade

If you are using the password option for the tentacle protocol then you must also add the password to the TENTACLE_EXT_OPTS in the /etc/init.d/tentacle_serverd  file e.g.

TENTACLE_EXT_OPTS=”-x YOURAGENTPASSWORD  …

If you do not do this then if you are using the agent password option then no agent data will be logged.

This is not a very secure way of data logging.


Reporting fake Facebook profiles (group post bumping)

Facebook Group Post Bumping

Spammers or trolls like to bump posts on Facebook groups so that they push down other legitimate posts. It could be for ideological, monetary or trolling reasons.

This section looks at stopping post bumping on a group that’s done by a Fake Profile. This is a group member (we’ll call BUMPER) who may or may not have blocked the admins (or blocked the “victim”) but what the BUMPER does is create a fake profile and copy the profile image and name from a “victim”  then post and delete the post and then deactivate their account.

All the group members see is the “victim” posting on the group but can never find the post (as it is deleted) but the effect is that the post is bumped to the top of the group recent posts.  If the victim is a trusted commenter then the other group members then think the post was important. In effect the bumper is stealing the reputation of the victim.

Or the bumper is a troll and is trying to get other legitimate people deleted from a group. The group members complain that the “victim” is bumping posts. The admins then send a warning to the “victim” (who will obviously deny they bumped the thread as they didn’t ). If the BUMPER keeps bumping posts using the victim fake profile details then eventually the admins would probably give up and block the “victim”. The bumper then updates their profile name and picture to their next victim and the cycle repeats.

To trap this you have two ways:

Finding and Reporting Fake Profile

The first way is to get the image location of the fake profile image and extract the Facebook ID from the group notifications. You need to turn on notifications for all posts on the group. Then when the bump happens then you will see the post notification with the fake profile image. You need to not click on the notification but identify the  “background-image: url(‘   ‘); details. This varies by browser but you right-mouse and “inspect element” or you can look at the page info and under media hunt for the relevant background image and then copy that image url. If you have no idea what this is then get a IT/web friend to help.

Here is a example fake profile image (I have changed the URL),
hxxps://fbcdn-profile-a.akamaihd.net/hprofile-ak-prn2/t1.0-1/c0.0.56.56/p56x56/10561831_1556141646027754_1263222964170380984_s.jpg

You can see 3 sets of decimal numbers between underscores and the Facebook ID (fbid) is the middle set of numbers between the underscores e.g. 1556141646027754

To visit this profile simply visit, facebook.com/1556141646027754  i.e. facebook.com/fbid

If the page is NOT visible then they have Deactivated their profile. Before you ask they have NOT blocked you because if they blocked you then you would NOT see the fake post notification.

You now have to wait and pounce. You have to work out the pattern of  bumps. If it is utterly random then a bit of a problem but if it is triggered on e.g. legitimate posts rising to a top of a group and then immediately that happens the BUMPER bumps a stale post then you may be able to see their profile.

When you do get through then you see a timeline that will contain images and profile picture copied from the real profile and you quickly need to report the profile as a Fake that is impersonating you. If you see the page and then it goes then the person is deactivating the profile. You need to retry until you trap them in the Facebook reporting system.

Post bumping but no notifications

If you see post bumps but there is no notifications then you or the fake profile has a block. If others (or admins) are complaining that YOU are bumping posts then that means a fake profile is imitating you and has blocked you. You need the admins or others to get the fbid and then get them to do the step above with finding the Facebook ID.

Admins trapping posts

If as an admin you see post bumping and deleting then as an admin you need to have an idea when it happens and then switch the group to admin approval only. Then the BUMPER post will be trapped in the admin approval queue and can’t be deleted. If the admins can’t see the details then that means they are blocked so they need to promote someone else and then get that someone else to block permanently (and ideally report to Facebook). Whoever does the ban/block need to verify they are blocking the fake profile and not rely on the name.

If the group is a busy one then this may be tedious and you may have to revert to Finding the Fake profile ID and then find the name in the group member list and verify the target is the fake profile (by examining the facebook ID name) and then block that fake profile.

Broken upstart causes Internal Error, No file name for udev

I was upgrading x2goserver and it stalled on * Cleaning up stale X2Go sessions. This is a normal log message within the /etc/init.d/x2goserver start() and it then runs x2gocleansessions after it logs this message. There shouldn’t have been any problems with this but it was just stuck there so I killed the dpkg and then I retried to add or remove anything but found that udev would not configure e.g. when I did sudo apt-get autoremove then I got,

Setting up udev (175-0ubuntu13.1) ...
invoke-rc.d: unknown initscript, /etc/init.d/udev not found.
dpkg: error processing udev (--configure):
 subprocess installed post-installation script returned error exit status 100!

Within synaptic when I tried to re-install udev then I got,

E: Internal Error, No file name for udev:amd64

The trick is that you can’t just re-install udev but must also re-install upstart.

This is because udev files link to upstart files and it is possible that a broken install has udev pointing at /etc/init.d/udev but that file is a link to /lib/init/upstart-job but the upstart is missing for some reason.

There may be other packages that have this kind of dependency e.g. winbind ufw squid3 and so on and certainly the x2goserver didn’t want to start properly. If you look in the /etc/init and see broken links to /lib/init/upstart-job then your problem should be fixed if you re-install upstart first.

As an aside after the upstart and udev was all cleaned up then the x2goserver removal and installation then worked.

Pandora FMS 4.0 to 5.0 upgrade quirks.

This was a painless upgrade but I found two quirks,

1) when you edit your config.php then you must set the chmod permissions to 600. If you try 400 then the Pandora Console still thinks that the file is readable by others. Obviously a bug but nothing to worry about. Note that to edit the ./include/config.php you must copy the new version 5 ./include/config.inc.php to ./include/config.php and then edit that new config.php and copy and paste in your custom settings from your old version 4 config.php file.

2) The ./extras/pandoradb_migrate_4.0.x_to_5.0.mysql.sql  (and actually any of those migration files) is missing a schema change to the tagente_estado table. It has,

ALTER TABLE `tagente_estado` ADD COLUMN `last_known_status` tinyint(4) NOT NULL DEFAULT 0;

but ALSO needs to have,

ALTER TABLE `tagente_estado` ADD COLUMN `last_error` tinyint(4) NOT NULL DEFAULT 0;

else the pandora_server won’t start.

PS3 bluray not reading disks

We got a few more months out of the fixes that I did here but then disks started to not read again. I dismantled the drive as per that post (see here) but at step 8 I did some additional cleaning.

Note that the floating lens that is right in the middle of the lens mechanism shouldn’t be touched. It is very delicate. It may have dust on the lens but don’t touch this unless you really have to. If you do see some dust then use a CLEAN cotton-bud and carefully slide off any dust.

a) Use a cotton-bud and remove the built-up grease on the drive guide-rods. These are the 2 stainless steel rods about 5 cms in length, one on each side that supports the lens mechanism. They had a build-up of crud at the ends.

b) Use a cotton-bud and remove the built-up grease on the drive worm-gear. This is a single bronze gear that is about 5 cms in length and as it rotates then it moves the lens mechanism (which slide up and down the guide rods). You can rotate the worm gear and this will cause the lens mechanism to move back and forth. It will automatically reset itself so don’t worry about moving it, just get rid of any built-up crud  that stops the lens mechanism from travelling from full inner to full outer position.

After doing that (and the previous fixes) then the PS3 started reading the disks again.

Using xboxdrv on Ubuntu to fault find PS3 Playstation controller

A Playstation PS3 controller has drift on the left hand analog stick. If you have the xboxdrv installed then when you plug the PS3 controller into a linux machine and then if you do,

 sudo xboxdrv --detach-kernel-driver

in a command console and hit the PS button on the controller then the command console displays the key/stick values continuously. For my broken controller the “X1” when idle is 224 something and not 128.

Obviously you could replace the potentiometer but that’s assuming you can get the parts but you can clean and refurbish the potentiometers.

To do this unsolder just the single potentiometer from the controller PCB. It is held in by plastic tabs to the housing of the analog stick assembly so lever it out on its own.

You now have a single small potentiometer with 3 pins. The centre pin is at the 1/2 way resistance point. There should be a small plastic split pin on the centre of the tiny potentiometer that removes the rotary plastic part. I used a cotton-bud and alcohol to clean the internals of the potentiometer.

I also re-sprung the rotary part by using a pin/knife to bend up the small contact springs so that it made a good contact even when wiggled. That’s the important part – you have to test it with a multimeter and make sure it goes from 0-10 k Ohm from the centre pin to the outside pins.

On my sample controller the potentiometer was marked “103” and this mean 10 K Ohm. The outside pins are the full 10 KOhm value and the middle pin varies from 0 to 10 Kohm. I made sure it went over this range scale and stayed solid even when the centre rotary part was wiggled. A loose spring contact will mean jerky game play.

Removing Delta Search Open Tab in Internet Explorer and Firefox

Delta Search is ad-ware that hooks into your browser experience. It appears to leave behind a few bits when it is removed. The last bit to remove that I found is that Delta Search is launched when you open a new tab in Internet Explorer or Firefox.

For Windows Internet Explorer: in Windows use regedit then you can search for delta-search
The change is,

HKEY_LOCAL_MACHINE\SOFTWARE\Microsoft\Internet Explorer\AboutURLs\Tabs

which should be as a default,

res://ieframe.dll/tabswelcome.htm

For Firefox: in Firefox go to the special URL about:config and find the parameter,

browser.newtab.url      

which should be

about:newtab

Opera Start tab doesn’t work in the same way so it doesn’t have this issue.

vTiger with PHP 5.4 ( session_unregister function removed)

With PHP 5.4 onwards the session_unregister function is removed. This means that you will get a “Fatal error: Call to undefined function session_unregister()”

vTiger 5.4 (the version number is just happen stance and has no relation to the PHP version number) code needs the following cludge to get around this. In /modules/Users/Authenticate.php around about line 69 then do the following change,

//Security related entries end
// TODO: session_unregister was removed in php 5.4.0 so must remove this backwards compatibility switch.
if (function_exists('session_unregister')) {
    session_unregister('login_password');
    session_unregister('login_error');
    session_unregister('login_user_name');
} else {
    unset($_SESSION['login_password']);
    unset($_SESSION['login_error']);
    unset($_SESSION['login_user_name']);
}

Kohana 2.3 (used by blue.box) and PHP 5.4

If you are using Blue.box to configure your FreeSWITCH softswitch then blue.box uses Kohana 2.3 and this has a quirk with PHP 5.4 which means that you will end up with a blank page (even after a clean git pull) plus a spurious array to string conversion error.

For the BLANK screen issue then the fix is,

See https://gist.github.com/kemo/2881489 for a working fix. Note that that patch isn’t exactly lined up on the line numbers – my git diff is,

diff --git a/system/core/Kohana.php b/system/core/Kohana.php
index 56b44af..ee6c832 100644
--- a/system/core/Kohana.php
+++ b/system/core/Kohana.php
@@ -677,7 +677,7 @@ final class Kohana {
                if (ob_get_level() >= self::$buffer_level)
                {
                        // Set the close function
-                       $close = ($flush === TRUE) ? 'ob_end_flush' : 'ob_end_c
+$close = ($flush === TRUE) ? 'ob_end_flush' : 'Kohana::_ob_end_clean';

                        while (ob_get_level() > self::$buffer_level)
                        {
@@ -686,7 +686,7 @@ final class Kohana {
                        }

                        // This will flush the Kohana buffer, which sets self::
-                       ob_end_clean();
+Kohana::_ob_end_clean();

                        // Reset the buffer level
                        self::$buffer_level = ob_get_level();
@@ -1604,6 +1604,30 @@ final class Kohana {

                return $written;
        }
+ /**
+ * Ends the current output buffer with callback in mind
+ * PHP doesn't pass the output to the callback defined in ob_start() since 5.4
+ *
+ * @param callback $callback
+ * @return boolean
+ */
+ protected static function _ob_end_clean($callback = NULL)
+ {
+ // Pre-5.4 ob_end_clean() will pass the buffer to the callback anyways
+ if (version_compare(PHP_VERSION, '5.4', '<'))
+ return ob_end_clean();
+
+ $output = ob_get_contents();
+
+ if ($callback === NULL)
+ {
+ $callback = arr::get(ob_list_handlers(), ob_get_level() - 1);
+ }
+
+ return is_callable($callback)
+ ? ob_end_clean() AND call_user_func($callback, $output)
+ : ob_end_clean();
+ }

 } // End Kohana

For the array to string conversion error you see the sort of useful orange trace back Kohana error page and this,

An error was detected which prevented the loading of this page. If this problem persists, please contact the website administrator.

bluebox/libraries/doctrine/lib/Doctrine/Query/Abstract.php [1103]:

Array to string conversion

To fix this you need to do changes to Abstract.php and Lib.php which is basically making a new function arrayDiffSimple and then adding that new function to the Lib.php.

diff --git a/bluebox/libraries/doctrine/lib/Doctrine/Lib.php b/bluebox/libraries
index 26c796d..d6b5c94 100644
--- a/bluebox/libraries/doctrine/lib/Doctrine/Lib.php
+++ b/bluebox/libraries/doctrine/lib/Doctrine/Lib.php
@@ -268,6 +268,45 @@ class Doctrine_Lib
         }
     }

+
+    // Code from symfony sfToolkit class. See LICENSE
+    // code from cto at verylastroom dot com
+    /**
+     * arrayDiffSimple
+     *
+     * array arrayDiffSimple ( array array1 , array array2 )
+     *
+     * Like array_diff
+     *
+     * arrayDiffSimple() has exactly the same behavior than array_diff, but can
+     * only 2 arrays. PHP versions > 5.4.0 generate some NOTICE if you use arra
+     * sometimes because of array_diff internal behavior with (string) casts.
+     * This method solves the problem.
+     *
+     * @param array $array1
+     * @param array $array2
+     * @static
+     * @access public
+     * @return array
+     */
+    public static function arrayDiffSimple($array1, $array2)
+    {
+        $diff = array();
+
+        foreach($array1 as $key => $val) {
+            if(!isset($array2[$key])) {
+                $diff[$key] = $val;
+            } else {
+                if(is_array($array2[$key]) && !is_array($val)) {
+                    $diff[$key] = $val;
+                }
+            }
+        }
+
+        return $diff;
+    }
+
+
     /**
      * Makes the directories for a path recursively.
      *
diff --git a/bluebox/libraries/doctrine/lib/Doctrine/Query/Abstract.php b/bluebo
index 981603d..6bc2820 100644
--- a/bluebox/libraries/doctrine/lib/Doctrine/Query/Abstract.php
+++ b/bluebox/libraries/doctrine/lib/Doctrine/Query/Abstract.php
@@ -1098,9 +1098,9 @@ abstract class Doctrine_Query_Abstract
         $componentsAfter = $copy->getQueryComponents();

         $this->_rootAlias = $copy->getRootAlias();
-       
+
         if ($componentsBefore !== $componentsAfter) {
-            return array_diff($componentsAfter, $componentsBefore);
+               return Doctrine_Lib::arrayDiffSimple($componentsAfter, $componen
         } else {
             return $componentsAfter;
         }
@@ -2070,4 +2070,4 @@ abstract class Doctrine_Query_Abstract
     {
         return $this->getDql();
     }
-}
\ No newline at end of file
+}

Fixing held packages after repository change (apt-get upgrade verses dist-upgrade)

This example shows a fundamental difference to remember between apt-get upgrade and apt-get dist-upgrade

The example is that I altered the repository for the 0ad game package from the default to the ppa for the 0ad (i.e. sudo add-apt-repository ppa:wfg/0ad) . I then did a sudo apt-get update and then I did a sudo apt-get upgrade 0ad

Nothing wrong with that except that there is a new package dependancy for the 0ad game and this new to be installed package causes apt-get upgrade to hold the package upgrade.

To fix this you use sudo apt-get dist-upgrade instead. It will ask if you want to upgrade the packages and more importantly ask if you want to install any new packages rather than just holding them and not doing anything.

PS3 Bluray drive clean-out dust bunnies and no disk load

This is electronic related so I’m going to post this. Three different problems,

  • Right at the start of the summer holidays our children’s PS3 bluray disk drive started to play up; symptoms are spurious ejects after load and poor reading of disks.
  • Then at the Christmas holidays the disks were not loading at all and the blue load light was always on.
  • and there has also always been a problem of poor on/off switch performance.

What I did (out of warranty repair – if your PS3 is still under warranty then let the store work out the problem),

1) Slide-remove the decorative cover (to left when PS3 is lying down flat with the bluray slot to the right) and then undo the 7 screws on the top case cover (has one short size screw and the rest are long – the hole with an ‘S’ is the short screw). Push in the tab at the back right hand side and then lift off the case cover up from the back – there are a row of tabs on the front that you pivot it out of these.
2) Unscrew the PSU – it has 5 screws in total (2 longer plus 3 medium), one plug on the front, the main 230 Volts on the back AND it has a pair of blade pins hidden towards the front so just lift it UP to slide out of the socket.
3) Un-connect the Bluray DVD ribbon cable by flipping up the black locking tab and remove the white 4-wire power plug for the Bluray on the front.
4) Flip the Bluray over and remove the 2 x silver and 2 x black tiny screws.
5) Remove the metal case cover. The DVD top retainer will fall out. It is OK it’s held in by nothing but the case.
6) Note the EXACT position of the white rotary parts that you can see. Remove the two tiny black screws on the main part of the disk loader mechanism – they are towards front. Pop up the two tabs on each side carefully. This whole lot comes off.
7) Pop in the tab in the middle of the front disk loader mechanism to release this. This lifts up.
8) Clean out all the dust bunnies. Note that the lefthand rack does not touch the black cog – that’s how it is designed.
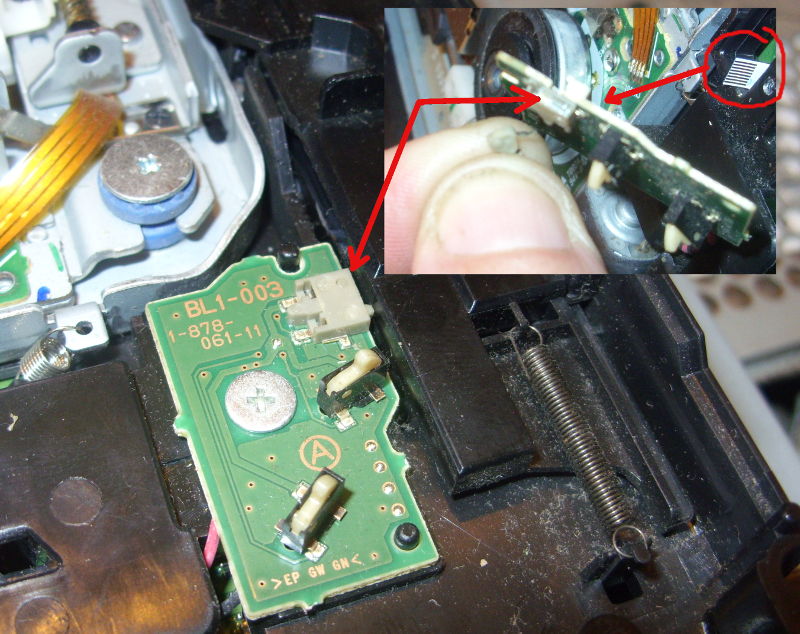
9) If disks are not loading or the blue disk load light remains on even when there is no disk in place then the right hand side has a PCB that has 3 tiny switches on it – 2 vertical that detect when disks are inserted and 1 flat that detects when the mechanism is in a ready position. Use a multimeter and check that these switches close circuit when pushed in and keep closed when you wiggle things around. The one I had fail was the flat one that gets moved by the tray mechanism. It can be dismantled and cleaned out (to do this unscrew the PCB, remove the flat ribbon on the underside, and use a finger-nail and pliers to pop out the switch lever. Clean any gunge on the back inside of the switch with a 0.5 mm solid wire e.g. wire gauge. ps3-load-sensor
10) Reassemble is in reverse BUT how the loader mechanism works is that as the disk is powered (tiny sensor switch to right) in then the left hand levers on the back part of the disk loader mechanism rotate anticlockwise as a disk is loaded and then this moves the left hand rack slider a bit so it hits the black cog. This cog then pulls the rack to the front and the slider then raises the platen. If you do not set the rotary parts right into the left hand slider then when the disk is loading it doesn’t rotate these bits of plastic so they don’t shift the slider to engage with the cog of the motor. You should be able to rotate the smaller left hand rotary part around so that it engages into a slot on the left hand slider – if you simulate a disk load then you will see it take up the slack in the left hand slider and hit the cog. If its doing that then this should work. It took a bit of practice to get this right.

Reassemble all the screws and stuff in reverse. There is no safety interlock so if you can run the Bluray with no cover and you should ideally do this without screen or controllers to verify the mechanism is loading and ejecting disks.  It will save you some hassle of re-assembling the lot only to have the disk disks not load !

If you are failing to get the disk to load right then you can run everything without covers or screws – just remember to keep the round white disk weight in place and DO NOT LOOK AT THE PRETTY LASER. If the PS3 starts up and the disk isn’t pulling in disks then check the ribbon cable is inserted right under the PSU. The LASER works but the motor won’t pull in disks if that ribbon cable under the PSU is out or out of alignment.

EXTRA: With the top cover off then the eject and power On/Off switch works by touching the small square metal pins on the PS3. These are connected to the outside case by metal strips that make contact when the case is re-assembled. To fix any poor On/Off switch (or eject switch) operation carefully lift up these metal pins so that they make better contact with the top case metal tabs.

That’s all – hopefully you’ll save the 40 quid for a new Bluray drive if you manage to get your old one cleaned out OK and your Playstation 3 will last for many years more.

vTiger 5.4.0 enable backup quirk

Note that from vTiger 6.0 onwards i.e. 6.5 and 7+ there is no default backup module. You’ll either have to buy a commercial module or roll your own script. The guide below will be obsolete.

I use the vTiger CRM product and it has a unusual quirk with enabling backups. Whilst the user interface (CRM settings -> Backup server) has check boxes to enable local and FTP backup the script actually tries to alter the following file, /user_privileges/enable_backup.php and in that set the two flags to a value of either true or false,

$enable_local_backup = 'true';

$enable_ftp_backup = 'false';

As the script has no permissions to do that then it gets a fopen() permission error (Warning: fopen(/*****/user_privileges/enable_backup.php): failed to open stream: Permission denied in /****/modules/Settings/SaveEnableBackup.php on line 43) and so when the ajax refreshes the screen it looks as if nothing has been done.

Without messing with your directory permissions then you can edit the /user_privileges/enable_backup.php manually.

Even if you manage to get the directory details into the local backup it will not work unless that enable local backup flag is set to true. It will say that it has done a backup but it will not save any file.

Mailfilter fails to POP timestamp in message-ID invalid

Mailfilter POP timestamp in message-ID invalid and potentially also causes mailfilter to stall at 100% CPU.

I have a fetchmail daemon that call mailfilter as a postconnect (defined in the .fetchmailrc file). I got the following error message,
mailfilter: Examining 297 message(s).

mailfilter: Error: POP timestamp in message-ID invalid.
mailfilter: Error: Parsing the header of message 292 failed.
mailfilter: Error: Scanning of mail account failed.
mailfilter: Error: Skipping account xxxxxx@example.com@mail.example.com due to earlier errors.

and I noticed that the mailfilter process was running at 100% CPU though that may be unrelated.

I found that mailfilter 0.8.3 has a new option of -i to ignore POP timestamp. This is probably what I want to make this more stable.

As I’m adding this to a Parallels based server it is unlikely to have this version of mailfilter as this package has very little development activity as it is a stable application so I had to build from source.

My server didn’t have svn so I browsed the Sourceforge svn for mailfilter on my local PC and at the bottom there is a linkfor “Download GNU tarball” I copied that link and then pasted into my console and used wget to get this latest tarball from Sourceforge. It has a odd name so moved that to a tar.gz file name e.g. mv index.html\?view\=tar mailfilter.0.8.3.tar.gz and then ran tar xvfz mailfilter.0.8.3.tar.gz

Perquisite packages for building,

  • g++
  • bison
  • flex
  • libssl-dev

There may be more but that is the ones I needed to add to my server.

Making this you cd to the mailfilter directory and then run

./autogen.sh
make
sudo make install

If that works then this’ll probably install the mailfilter to /usr/local/bin/mailfilter so now in the .fetchmailrc change the postconnect line to have,

postconnect ''/usr/local/bin/mailfilter -i ''

use double quotes if you pass the new -i option to ignore timestamps. The -i is a new feature in Mailfilter 0.8.3 (not in 0.8.2).

Killall the mailfilter and fetchmail and then re-launch your fetchmail daemon.

Errors

Missing g++

If you see,

checking whether the C++ compiler works... no
configure: error: in `/root/sources/mailfilter':
configure: error: C++ compiler cannot create executables
See `config.log' for more details.

Then check the log file and look for g++ line e.g.

configure:2879: checking for g++
configure:2909: result: no

Do a g++ and if it comes back with -bash: g++: command not found then install the g++ package and then it will work. Re-run the ./autogen.sh and then make

Missing bison

If you get the make fail and you can see /bin/sh: yacc: command not found then you need a YACC of some kind. I installed bison re-run the ./autogen.sh and then make

Missing flex

If you get an error in the make e.g. it crashes out with g++: rcfile.cc: No such file or directory

g++: no input files
make[2]: *** [rcfile.o] Error 1

then check back and see if you see error: FlexLexer.h: No such file or directory . If so then check flex is installed. Install and then re-run ./autogen.sh and then make

Missing openssl header files
If you see openssl/ssl.h: No such file or directory and similar openssl/rand.h: No such file or directory then you need to install libssl-dev. Install that package and then re-run ./autogen.sh and then make.

After a month and a few weeks of use it has been stable. The erroneous timestamps are also suspected to stall Outlook 2003. I pick up emails in parallel to my customer to provide emergency support when they are on holiday. As Microsoft support for both XP and Office 2003 is finishing in April 2014 I plan to migrate the customer to a newer OS and Office version.